RussOgi.com
  • Home
  • Blog
  • 3D Printed Art
  • Other Works
  • In The Media
  • Shows

Letting The Cat Out of The Bag Part 2

6/26/2017

0 Comments


Where Did The Cat Come From?

PictureConcept illustration
In this post, I'll be continuing where I left off in Part 1.  If you haven't read that post and would like to before reading this post you can find it here.

What came first? The 3D print or the virtual model? Unlike the chicken and the egg, the virtual model has to come first.

I started on this project with the client, Island Insurance, providing me a concept illustration (pictured right).

The illustration provided was only a front view but Island Insurance wanted him to be a full 360 degree sculpture in the round and not just a facade.

Sometimes, even if a character or prop is not intended to be seen from other angles, having it complete gives the marketing and production teams the opportunity to improvise on the spot and shoot from a larger variety of angles.

It also gives flexibility long term to be able to shoot the character from other angles even if the original intent was to shoot it only from the signature angle, in this case, the front.

Creating a sculpture in the round from just one image always leads to a lot of interpretation on my part. It is more time consuming. I have to imagine what the character looks like from the back and from the sides, top and bottom.
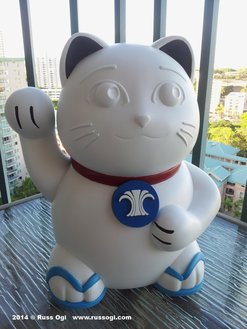
PictureThe Cat in full 3D
I also consider how all the details and features work together as you move around the sculpture. Sometimes, what looks good from one angle looks odd from another.

It takes more time not only in modeling but also in communication with the client. I have to secure approvals for all the decisions I make.

As an artist, I tend to work more on projects with a single sketch or image that requires me to infer what the rest of the 3D piece will look like. It is a challenge, but it leaves leeway for creativity and interpretation. I prefer that freedom of creativity opposed to following exact measurements.

PictureFront view (left) Perspective view (right) in Autodesk Maya
To match the concept image as closely as possible, I use a process similar to rotoscoping in computer animation.  I start by importing the concept illustration into the 3D modeling software.

I position the concept illustration on an image plane.  The image plane is a virtual flat plane that shows any image applied to it.

Then, I use 3D shapes to trace over the illustration on the image plane by looking through the front view.

In the image above, the left half of the image shows the front view.  This view is orthographic with no perspective distortion which allows me to trace the picture on the image plane exactly.  If you look closely, you can make out the picture of the Cat through the 3D model's wireframe.

The right half of the image is what you would see in the perspective view of the software.  I included that view to give a better idea of the position of the image plane in relation to the 3D model of the Cat.  

Picture
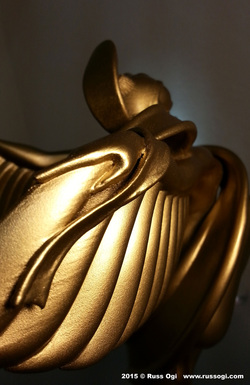
Claw lines as indentations
As I built the features, I also kept in mind painting the physical prop.  It was to be hand painted but also needed to match the drawing exactly. 

To accomplish this, I modeled references for all the painted details.  For example, to paint the black lines that define the paws, I created recessed grooves (pictured left) to indicate the exact shape and placement of the paw lines on the physical model.

Once this computer model was finished, it was 3D printed. The surface was prepped and painted to give a smooth appearance.  I'll be talking more about that process in the next installment.

For this first round of TV commercials, the Cat's face would be animated so its facial features were not painted black.  You can see an image of what that looked like at the end of Part 1 of this blog series.

This is where the real and virtual worlds take a twist.  The facial features from the computer model used to 3D print the physical prop was utilized again in the animation of the face. Since the same computer model gave rise to both animated and physical Cat, they more easily matched up.

A couple of years down the road, Island Insurance approached me to recreate their iconic mascot. This time they wanted it fully formed with a painted face. On the second Island Cat, a few changes to the face were made as the expression of the Cat had evolved from their original concept illustration.
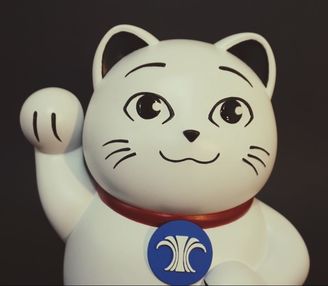
Picture3D Cat with 2D face
To get things just right and match the current images of the Cat in advertisements, many little nuances were discussed on just the face alone. You'd be surprised how many.

The image to the right was the picture of the Cat's face that I needed to match.

I used the same rotoscoping technique described above to model the new facial features.

Once the 3D computer model is done. It is again 3D printed, assembled and painted.

That's about all for the Cat in the virtual world. I'll talk about what happens back in the real world in the next installment.

Perhaps in a future post, I'll cover more details about dealing with the challenges of “imagining” the rest of someone else's design and maybe even the difficulties of creating a real figure from a cartoon.

Click here to continue on to part 3 where I talk about the finish work that went into the Island Cat prop.

Please share any questions or adventures you've had with 3D computer design in the comments below.

0 Comments

What Things To Consider When Using 3D Printing Technology?

6/19/2017

0 Comments

 
Picture
Feeling disconnected from 3D printing?  Where do you start?

Through my consulting, I have met many product designers, inventors and artists that have an interest in using 3D printing. Many of them don't know where to start, what is involved or what the process even looks like.


I am going to aim this post at artists but the principles are generally the same no matter what you do. So, here are the basic requirements to work with 3D printing.  This is in no way comprehensive, instead it is a very general overview.

1) 3D printing requires a watertight 3D virtual model. To create that virtual model, you will need to work with a 3D CAD designer or learn 3D design software.

If someone is creating your 3D virtual model, you may need to provide them with orthographic views of your design and/or provide measurements. Depending on who you work with, some people can, or are comfortable, working from a single sketch. But generally, the more information you can provide, the less time it takes to create the virtual model. Usually, less time means less cost. If you only provide one view, they will have to infer/imagine what the design looks like from other angles.

2) There are many different 3D printing technologies. You should understand the benefits and limitations of each technology or at least have a general understanding of the technology you're planning to use. It will help you choose the best 3D printing technology for your project. It's a good idea to not rely on a manufacturer's sales material.

For example, Fused Filament Fabrication (FFF) technology typically offers lower costs and larger build sizes but has the roughest surface finish and can be slow in producing parts.  Refer to the images below of a couple diagrams of different 3D printing processes.

FFF 3D printing diagram
Diagram of the typical FDM/FFF 3D printing process.
SLA 3D printing diagram
Diagram of the typical SLA 3D printing process.
3) Post processing will most likely be needed for your 3D prints. This may involve traditional hands-on techniques to smooth and paint your print or even casting. It could also involve other technologies like machining. If you do your own 3D printing, post processing may involve removing supports by hand.

Please keep in mind, this is a very, very general overview of what's needed for a 3D printing project. There are many finer facets to each of these points and considerations that are specific to each project.

Let me know your thoughts about 3D printing or any advice you have for those who want to use the technology in the comments below.
0 Comments

Letting The Cat Out of The Bag Part 1

5/30/2017

2 Comments


Do The Cat and I have History?

Picture

Insurance companies aren't usually the first places that come to mind when I hear 3D Printing and Computer Graphics. But it is now, at least when I think of Island Insurance and their spokes...cat.

The project involved the development of a physical prop of the Island Insurance mascot, the Island Cat. The Island Cat was part of a series of light-hearted commercials that utilized an interesting combination of 3D printing and cutting edge computer generated animation to bring the Island Cat to life on the small screen.

In fact, parts of the same 3D computer model were used to create both the physical 3D print of the Cat and do the computer animation.

I get asked all the time about the projects I've worked on. Unfortunately, I'm often not allowed to talk about a lot of my client work since they're usually part of a project that hasn't gone public yet. That was the case when I first worked on the Island Cat prop.

But now, the Cat's out of the bag. I received special permission from Island Insurance to talk about how the Island Cat went from 2D concept illustration to the star of it's TV commercials.  The links below go to a couple of the original commercials.  And if you'd like to know more about Island Insurance you can visit them online here.

Click here for the "Fishing Buddy" commercial

Click here for the "Big Hitter" commercial
Picture
Several months back, I was contacted by Island Insurance to create a second shooting prop of their mascot, the Island Cat. The Island Cat is based on the Japanese Maneki Neko (beckoning cat).

Although there are many variations, the Maneki Neko is generally regarded as a symbol of good fortune or prosperity.

The Island Cat, is a Maneki Neko with a Hawaiian flair to it. Most notably, he wears rubbah slippahs (AKA flip flops to those of you outside of Hawaii). Also, instead of a traditional bell or medal, he has a medallion with the Island Insurance logo on it. He is, after all, a brand representative.

This was actually a return to the project for me. I worked on the original prop for Island Insurance a couple of years back. The first prop, was created specifically for a series of commercials where the Cat's face and paw would be animated via CG (computer graphics).

Originally, I was contacted by a buddy of mine, writer/director, Ryan Kawamoto from Kinetic Productions, to work on the project. He wanted a physical prop of the Cat to shoot with.

Why not just create the entire cat in CG? Well, to create a realistic looking CG prop is difficult and time consuming. It takes a good deal of effort to get the highlights and shadows to match real world lighting conditions. The result can be close, but the human brain can perceive the difference.

Also, for the actors, it is usually easier to act with a character that is actually there, on set with them, rather than pretending the character exists.

So, having the Cat as a real prop with only the animated face and paw added in made life easier for production. And that's when Ryan pulled me into the mix. The deadline and budget were extremely tight. Almost to the point where I turned down the project.  But, with the help of 3D printing, I was able to fabricate the Cat on budget and in time for its first shoot.

Picture
The finished prop had raised 3D facial features but they were not painted in. We decided the raised features would aid the CG animation team with placement of the digitally animated face.

Fast forward a couple of years, Island Insurance decided they wanted a version that had the face painted in. However, as with most characters, and people, their faces change over time. The Cat's face had evolved a bit from the original concept illustration, so Island Insurance wanted an update to his facial expression.

And that's my history with the Island Cat.  I'll be following up in a week or so with Part 2, creating the virtual sculpture that would eventually be 3D printed.  Part 3 is also now available where I talk about the work that goes into turning a 3D print into a finished prop.

Have you ever worked on a project like this or have any thoughts about the Island Cat? Please leave a comment below.

2 Comments

What About The Raijin and Fujin Kabuto?

6/15/2016

0 Comments

 
Picture
I've been meaning to consolidate the links to the i.materialise blogs that I did for the Kabuto Design Challenge all in one place.  Finally got around to it.  Both English and 日本語. 

Blog 1
Developing the concept...
Blog 2
Building the model...
Blog 3
Making the model watertight.


ブログ1日本人
3Dプリントが日本のサムライ文化に出会う―「風神雷神兜」デザインコンセプトが生まれるまで

ブログ2日本人
Autodesk Maya で兜を3Dモデリングしてみよう

ブログ3日本人
これだけは知っておこう!Autodesk Mayaを使った3Dプリント前の下準備

0 Comments

What Lies Behind the Kabutomushi Yoroi?

6/15/2016

0 Comments

 
Picture
Kabutomushi Yoroi (Japanese Rhinoceros Beetle Armor) – 1:1 scale armor. It is approximately 4' 9” tall on the stand and posed in the traditional “seated” position. It is a 3D printed and mixed media sculpture.

This piece is an original design influenced heavily by traditional Yoroi (Japanese armor) and incorporates a fusion of contemporary tactical and aesthetic considerations. Comprised of over 60 individual pieces, the sode (shoulder armor), kusazuri (waist armor), yodare kake (throat guard) and shikoro (neck guard) are strung together with black odoshi (lacing) based on traditional lacing patterns.

The red sections are hand finished with a custom textured undercoat to convey the organic feel of an insect exoskeleton and then coated in a layered red metallic finish.

Check back often.  I'll be updating this post with more information and pictures about the Kabutomushi Yoroi including some work in progress stuff.


0 Comments

Fine Art...3D Printing an Evolution

5/5/2016

0 Comments

 
Evolution of Freedom

FOR IMMEDIATE RELEASE:


Fine Art...3D Printing an Evolution

SAN FRANCISCO, California, April 26, 2016 - Eileen Borgeson and Russ Ogi are accomplished artists on their own but on their first collaboration, they gave rise to a truly amazing work of art, the "Freedom of Flight."

On display now at the Innovation Hangar, a non-profit museum and innovation space located in the iconic Palace of Fine Arts, “The Evolution of Freedom”, featuring two unique 3D printed sculptures of the “Freedom of Flight” (“Freedom”).  A standout in 3D printed works, “Freedom” pushes the notion of 3D printing as a fine art medium.

“Freedom” is a unique blend of traditional craftsmanship and state of the art technology.  This sculpture in the round takes full advantage of 3D printing's capability to create complex and interwoven positive and negative spaces that are difficult, sometimes impossible, to produce through other means.  Once 3D printed, the sculpture's surface is meticulously refined by Ogi with hand applied oil paints and layered in 23k gold and palladium by Borgeson.

Because of the interwoven features of the design, Borgeson spent years searching for the right art medium to bring her vision to life.  “Freedom” proved to be one of her most challenging designs to translate into a physical sculpture. "Finally 3D Printing appeared on the art/technology scene and I saw a way to achieve all the negative spaces within the sculpture design...then we discovered Russ." said Borgeson.

She initially found Ogi through his association with the Pacific International Space Center for Exploration Systems (PISCES). Once they began to collaborate, she was amazed at how quickly she and Ogi were able to develop the 3D sculpture.

Ogi is no stranger to giving a third dimension to 2D pictures and has a keen sense of translating the drawings of others into 3D digital forms.  He uses the Autodesk Maya 3D Design software to create the digital file needed for 3D printing.  In addition to his skill with computer software, he is just as comfortable with hand crafting works of art.

“Freedom” started from one of Eileen's original sketches called “DNA”.  She was inspired by Holographer/Visionary, Jeff Allen, Eileen's partner of 22 years. Initially Allen saw a sculpture of “DNA” being presented to Elon Musk for his “out of this world” accomplishments in the Commercial Space Industry as the “Spaceman of the Year” Award.  After seeing the 3D printed sculpture, with Allen's direction, “DNA” was re-christened “Freedom of Flight.”

DNA Drawing
Borgeson's original DNA drawing
Ogi recalls, “every 2D design presents its own challenges.  Eileen had only a single drawing. For me, the challenge wasn't how to design the interwoven forms into something that could be physically fabricated but rather envisioning a full 3D sculpture from a single 2D drawing.”  "And an incredible job he did." adds Borgeson.

The “Evolution of Freedom”, includes the original maquette and the last iteration of “Freedom,” which is a 3D printed adaptation for holography.  This is the first time both pieces are displayed together (with a 16" version debuting last year in the Bay area). And the first time the maquette is on display since its debut at the 2013 Hawaii Aerospace Summit in Honolulu.

Borgeson and Ogi continue to refine their design and so “Freedom's” evolution continues.

 Additional images available on request.​
Freedom of Flight
Hand applied oil paint, 23k gold and palladium
About Eileen Borgeson
Borgeson's artistic talents and abilities have been selling for over 35 years.  Her main focus has been glass art and sculpture, incorporating different mediums (i.e., bronze, crystal, stainless, neon, LEDs., water jet cutting, CNC routing and terazzo).  Thousands of pieces of her art are a part of private and corporate collections in over 50 countries worldwide.

Among her clientele are the John Lennon Estate, Warner Bros., Disney, Sony, Aerosmith, the international commercial space flight industry and the Federal Aviation Administration.  Although renowned for her art pieces and her award designs for the television, movie and other industries, Borgeson also has installations in cities across the US including San Francisco, Las Vegas, New York, New Mexico and San Diego.

She works with a variety of traditional media and styles but her forte is the Art Deco style etched and cast glass mediumS.  She spent seven years working with world renowned artist Erte, considered by many to be the father of Art Deco.

Borgeson's other works can be seen at:  www.eileenborgeson.com  
Contact:  [email protected]

About Russ Ogi
Based in Hawaii, Ogi is a mixed media artist with a background and passion for photography and traditional sculpture.  Raised in a crossroad of cultures like Hawaii, he grew up with Eastern and Western influences. The result is a unique fusion of Eastern and Western aesthetics and tradition reflected in his art.

Sculpting in Autodesk Maya, Ogi 3D prints his digital models in a array of media from plaster and plastics to metal.  His completed 3D prints often undergo meticulous hand crafting utilizing custom finishing techniques to further instill a feel or emotion into a piece.  

With almost 20 years of experience in the high-tech industry, and his background in Additive Manufacturing, Ogi has also served as a consultant for numerous financial, safety and product development organizations internationally.  Among some of his notable clients are the Hawaii State Department of Education, the Defense POW/MIA Accounting Agency (DPAA) and the New York Office of the Chief Medical Examiner.

Ogi's other works can be seen at:  www.russogi.com  
Contact:  [email protected]

About the Innovation Hangar
The Innovation Hangar (iHangar) is a free, non-profit museum, located in the iconic Palace of Fine Arts in San Francisco.  The Palace of Fine Arts embodies the innovative spirit that defines the Bay area and was a centerpiece of the 1915 World's Fair.  The unique social innovation space is designed to be a place where thinkers, doers and critics can come together under one roof to facilitate connections, ideas, investments and the arts in a way that simply cannot happen in the virtual world.

iHangar provides work and lab spaces designed to facilitate interaction with innovators, entrepreneurs, and students. New inventions and prototypes, along with rotating exhibits, artist in residence programs and more have already animated the iconic Palace of Fine Arts space, welcoming over 500,000 visitors since opening in February of 2015.
3601 Lyon Street, Palace of Fine Arts Exhibition Hall, San Francisco, CA  94123
More information about the iHangar can be found at their website:  www.ihangar.org 

​C​ontact the iHangar, email Bethany Shine at: [email protected]

###
0 Comments

Negativity.  Are You Fireproof?

12/17/2015

1 Comment

 
Picture
I happened across this video of Nika Harper's presentation, "How To Become Fireproof: Surviving Internet Negativity" at the Game Developers Conference 2014 and had thought of Tweeting it. 

It touches on a topic that affects us all both on and off the internet - negativity.  So I felt compelled to express my thoughts and reactions.

Being from the Game Developers Conference, it looks at negativity from the viewpoint of a developer receiving negative comments but at its core, much of the thoughts and techniques for dealing with negativity are universal.


Having grown up bullied, I have especially struggled dealing with negative comments.  Most people probably do, even people who have confidence and great self-esteem. 

M
y wife and I have often talked about how bullying was when we were growing up and how much more difficult it is for kids today with how far reaching and easy it is to bully others through social media.

For this posting I wanted to introduce the video.  I thought it was significant enough to say a bit about why this video interested me so much.  For those interested, I will follow up with a second posting focused more on my thought on individual points from the video.

Please leave a comment below with your thoughts on the video or negativity or negative people.


1 Comment

What's The Meaning of This (Logo)?

11/25/2015

0 Comments

 
PictureRussOgi.com logo
I have always had a fascination with logos.  A well done logo is visually appealing while meaningfully representing a person, brand or product.  It should be memorable and evoke feelings. 

The best logos are often tied to, and represent the history of a brand or person in addition to visually representing current values.

I find logos to be highly creative.  As an artist, I feel it puts me in touch with the creative thoughts of the logo's designer(s). So much thought gets packed into a concise visual package.  My favorite logos clearly represent a concept at a glance but under further examination reveal more meaning.


Some of the most prominent logos are the emblems on cars.  I have time to look at them while sitting at a stop light. 
One day while driving, I pointed out to my wife the Kia "K" logo.  A pretty slick and dynamic logo reminiscent of the Lexus "L" logo. 

It is very unlike the typeset "KIA" in an oval logo.  I had seen the "K" logo only recently and seem to see them more often.  I wondered if it was a new logo for the car company. 

I did a Google search and found this article explaining the relationship between the two logos.

It turns out, the KIA article was part of a series about the meaning behind a number of car logos.   You can read more of them at this link.   What I found engaging was not only the current meanings, but (for some) the evolution of the logo and how that ties into the brand and history of the company.

My fascination with hidden meanings in logos, carries over to my 2D and 3D designs.  I incorporate symbolism or meaning into the lines in my armor designs.  In fact, I try to infuse every line or set of lines in my armor sculptures with meaning, sometimes obvious, sometimes hidden.

I have designed a few company logos and I find the design process a great exercise of creativity. So much must be said with so little.


If you have a favorite logo or have any thoughts or advice on designing logos please leave a comment below.


0 Comments

Movin' On Up (to the Surface Pro 4)?

10/14/2015

0 Comments

 
Surface Pro  and Pro 3
The Surface Pro 4 was recently announced so was the Surface Book.  Both computers were of great interest to me.

So with that being said, I am not normally an early adopter, especially of technology.  In fact, when it comes to computers, I usually run it until it dies or it can't run the software I need.

One of those exceptions was the Surface Pro.  upgrading from an Android tablet, I bought the first gen Surface Pro as soon as it was available.  I did forego the second Surface Pro.  While It did address some of the limitations of its predecessor, I felt that it didn't offer a significant enough of an upgrade in performance and form factor for me.

The Surface Pro 3 was a huge jump from the first gen.  I pre-ordered it and got it as soon as it was available.  I have not been disappointed.

One of my initial fears was Microsoft's use of the N-Trig technology.  One of my main uses was as a digital sketchbook.  I did research the differences between N-Trig and Wacom technology especially the pressure sensitivity.  I found this great article.  It was one of the deciding factors for me.

Ultimately, I was sold enough on the N-Trig technology to move forward and purchase a Surface Pro 3.

I am temped to purchase the Surface Pro 4.  I like a lot of the improvements.  But the Surface Pro 3 is holding up well for me so far, and the improvements don't seem like they would impact my work too much.  I am hoping that there will be a big leap in improvements from gen 4 to 5 like there was between gen 2 to 3.

I like the Surface Book form factor.  It sounds like it will be the solution for many people looking for more battery life or processing power.  It will also be the solution for those who want the "laptop experience".  For me, the Surface Pro 3 has great processing power for what I do and decent battery life.  I also don't often use it in my lap. 

The lighter weight and slimmer profile of the Surface slate form factor is more beneficial to me than a larger longer lasting battery.  I'm on the road sometimes and I don't know if I'll need my computer or not.  I also sometimes find myself with some time to kill especially when plans change at the last minute. 

In either case, the Surface Pro 3 is small and light enough for me to carry just about all the time.  So I have full computing power handy all the time.

So I don't see myself being in the market for the Surface Book.  But I do see a solid place for it in the Microsoft Surface product line.

Please leave your thoughts about the Surface Pro 4 or the Surface Book in the comments section below.

0 Comments

How Do You Get to the Ideal Sculpture?

9/26/2015

0 Comments

 
Picture
In a film appreciation class, I was once taught that, in the ideal movie, visually, every frame would be composed and lit perfectly.  You could stop on any frame in a movie, and it would be a visual work of art in, and of, itself. 

Well composed, well lit, with a fore, middle and background.  This single frame would tell its own story and carry it's own visual interest.  A picture suitable for framing and displayed as photographic fine art.

That is all in theory.  In the real world, I'm not sure it's possible.

I apply this concept to my virtual sculptures.  I adapted my sense of composition and light from photography to my virtual sculpting and began to take more time to pan the camera around my model and view each angle as a snapshot of the piece.  

My goal was to eliminate angles with weak profiles.  Usually, a sculpture has a "signature" angle - the view that it looks the best from and is usually viewed from. 

In past projects, I have been aware of how my sculpts look from the major angles - front, back, left and right.  But the "Freedom of Flight" was the first time I spun the model to see how the lines continually flowed as the viewer moves around the piece.

The "Freedom of Flight" sculpture is a collaboration with artist Eileen Borgeson and holographer Jeff Allen.   An article about our project can be found here.

When it came time to fine tune the sculpture, in Maya, I rotated the sculpture a few degrees and followed the lines of the figure and the strand that encircled it. 

It was a mater of rounding out the strand at certain points or bringing it closer to the figure in some areas and moving it away in others.  Sometimes it was even changing the angle of a section looking to see how they all played together as one silhouette paying special attention to the wings making sure they read as wings or created dynamic lines.

To see something is to observe how light and shadow describe its surface.  Initially, I applied a middle grey blinn shader and watched the way the light (usually a key and fill light) played off the surfaces.  I noted how the highlight morphed and flowed as I rotated the sculpt. 

I made many subtle adjustments.  Adjustments, that, unless you compared the before and after models side by side, you might have a difficult time picking out the differences.  You would only know that the "after" model looked or felt better.

While I've done similar evaluations with other sculptures before, this was the first time that I had been so meticulous, stopping every few degrees to note it's composition.

Please share any of your thoughts or tips on digital sculpting in the comments section.


0 Comments
<<Previous
Forward>>
    Picture

    RSS Feed

    Author

    Based in Las Vegas but originally from Hawaii, Russ Ogi is a mixed media artist.  His background and passion are in photography and traditional sculpture.

    Raised in a crossroad of cultures, he grew up with Eastern and Western influences. His art reflects that unique fusion of aesthetics and traditions.

    Sculpting in Autodesk Maya, Russ 3D prints his digital model in a variety of media from plaster and plastics to metal.

    From here, his prints often undergo meticulous handcrafting. He often utilizes custom finishing techniques to further instill a feel or emotion into a piece.  

    With almost 20 years of experience in the high-tech industry, and his background in Additive Manufacturing, Russ has also served as a consultant for numerous financial, safety and product development organizations internationally. 

    Among some of his notable clients are the Hawaii State Department of Education, the Joint POW/MIA Accounting Command (JPAC currently DPAA) and the New York Office of the Chief Medical Examiner.

    He has been a sponsored or featured artist with companies such as Autodesk, imaterialise, 3D Fuel  and, LulzBot.

    Archives

    April 2021
    March 2021
    March 2019
    February 2019
    January 2019
    November 2018
    June 2018
    March 2018
    January 2018
    October 2017
    August 2017
    July 2017
    June 2017
    May 2017
    June 2016
    May 2016
    December 2015
    November 2015
    October 2015
    September 2015
    August 2015
    July 2015
    June 2015
    May 2015
    April 2015

    Categories

    All
    3d Printing
    Armor
    Art
    Blockchain
    Cinema
    Educational
    Exhibitions
    Half Scale Samruai Armor Build
    Half-scale Samruai Armor Build
    Personal
    Samurai
    Technology

    RSS Feed

Copyright Russ Ogi 2024

Web Hosting by iPage